Blog

  • SHARED BOYS BEDROOM FINAL REVEAL

    SHARED BOYS BEDROOM FINAL REVEAL

    It’s HERE!!!! Our final reveal of the boys shared bedroom with two queen size beds, oh yeah! If you are just finding us for the first time let me take a minute and introduce us to you. We are Danielle and Michael. Yes, we’re married, for 7 years, been together for 12 and have two little dudes Enzo (5.5) and Ziggy (3). We love creating spaces that feel like home. We like it so much that we run our own company here in Michigan that does just that. You can read more about the services we offer with Clark + Aldine here…in case you’re looking. Over the past 6 weeks we have been working hard to create a space that reflects the personalities of our dudes.


    Week 1  |  Week 2  |  Week 3  |  Week 4  |  Week 5


    Which leads us to Week 6, otherwise known as our final reveal. I’m going to take you through each area we’ve worked so hard to create. Our number one focus when creating this space was to make it feel like Enzo and Ziggy’s space. I wanted anyone to be able to walk into the space and be able to tell who’s bed was who’s and see their big personalities shine throughout the entire room. We started with taking down the jungle wall. While I personally loved this wall treatment I felt it really didn’t vibe with our dudes. We replaced the jungle with a 3-dimensional wall treatment that I couldn’t be happier with. I love how it has added an extra layer of texture to the space. Plus the shadows that come off the wall are insane. If you’re wondering just how we created it go ahead and click here! We’ve got a full DIY tutorial on how to make a 3-d wall treatment of your own.


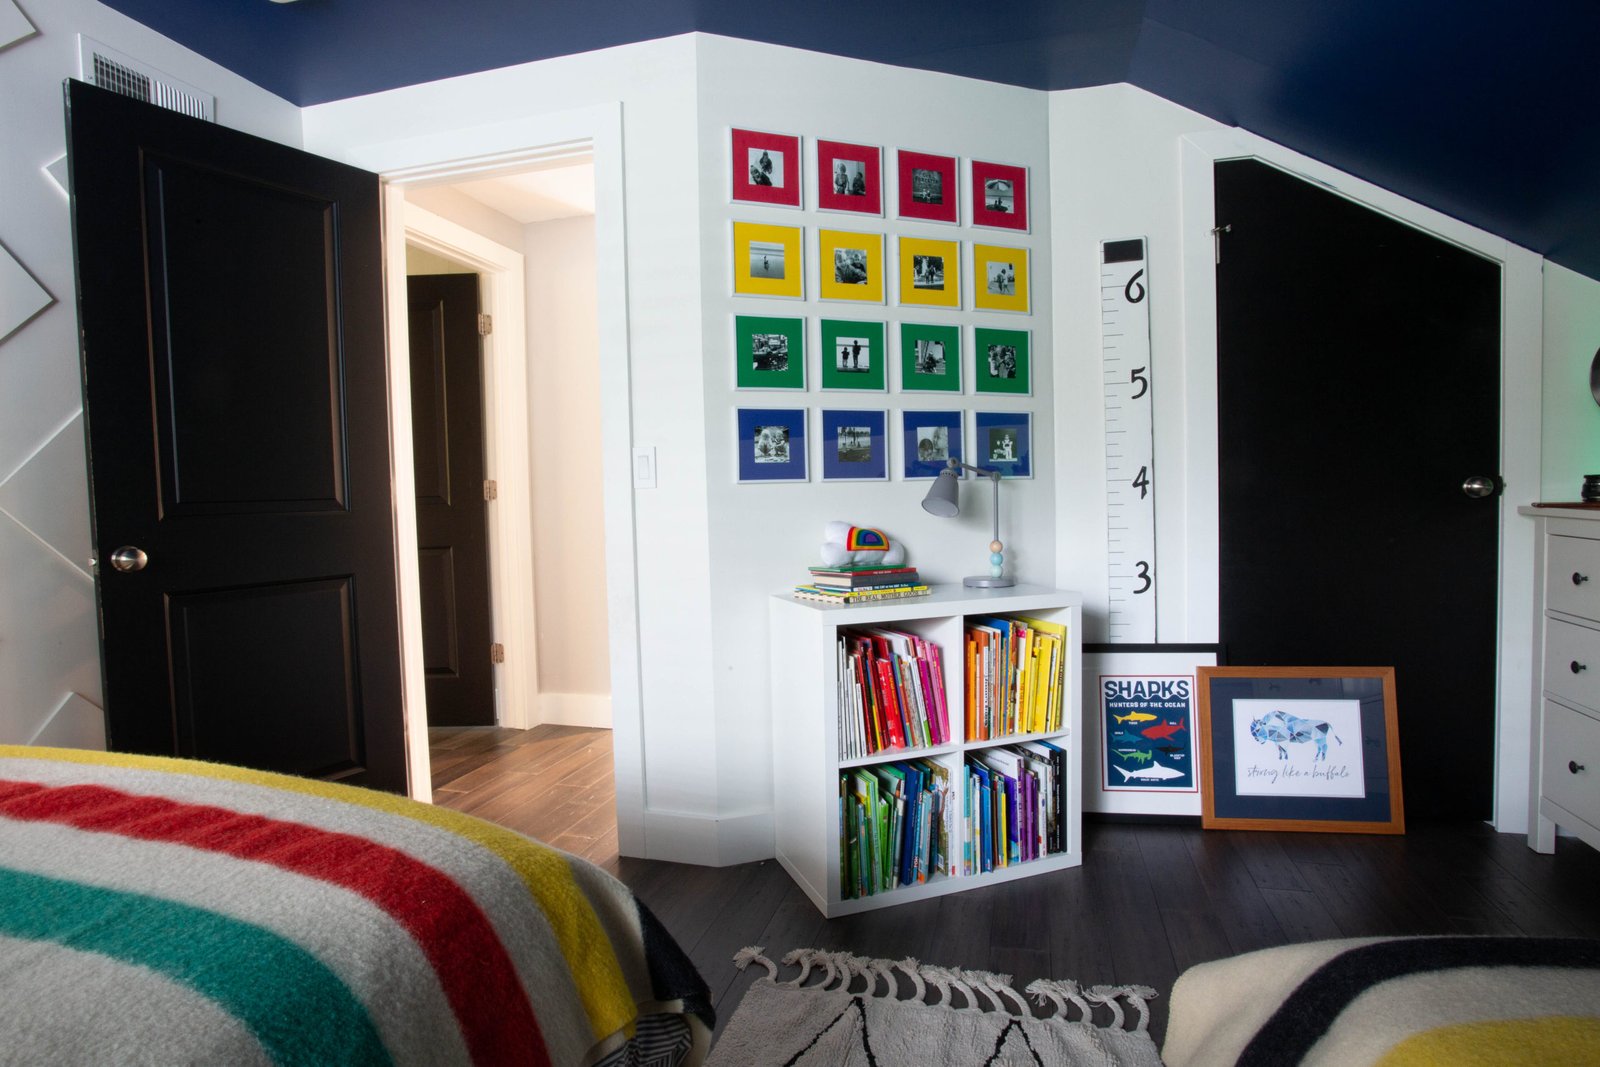
    One all the walls we used Sherwin Williams Alabaster which I love. It is the perfect creamy white and goes so well with the Ikea pieces we have. This is something you’ve got to pay attention to because I swear some of the white pieces from Ikea seem to have a pink undertone and with the wrong white it makes the furniture look pink not white! This is the dresser we have. We also have this bookshelf.


    This Ikea dresser has served our family well. It is actually the first piece of furniture I bought when I moved to Chicago fresh out of college! Which was only a minute ago?….or maybe a bit longer. Needless to say it’s served us well and it was time for a little update. We simply took off the hardware and replaced it with these wooden knobs from hickory hardware. We spray painted them the primary colors seen throughout the room! Gotta love a REAL simple DIY project and just like that old Ikea dresser is feeling new again! For styling, Enzo and I created a book box that he uses for school and his jar full of warm fuzzies that make their way home when he does something good in the classroom! I added a vintage van from when Michael was a little boy, and a vintage globe for another pop of color! The wall art behind them was made by the boys.


    On the bookshelf I wanted to create a functional yet beautiful display of all my favorite children’s books. The rainbow has been serving this crew well! Both boys are able to find books and put them away. That whole putting them away part is really making my mama heart happy. Did I mention they are putting them away in the correct color section independently…oh yeah! All I did was simply organize the books by their binding colors. For the overwhelming amount of white colors I used the writing on the binding of the book to organize them. This helped to divide the amount of white books while adding some pops of white to break up the color on the shelves. Honestly this part hasn’t been that difficult for the boys to follow. Enzo totally gets the system and Ziggy can just remember where the book is from!


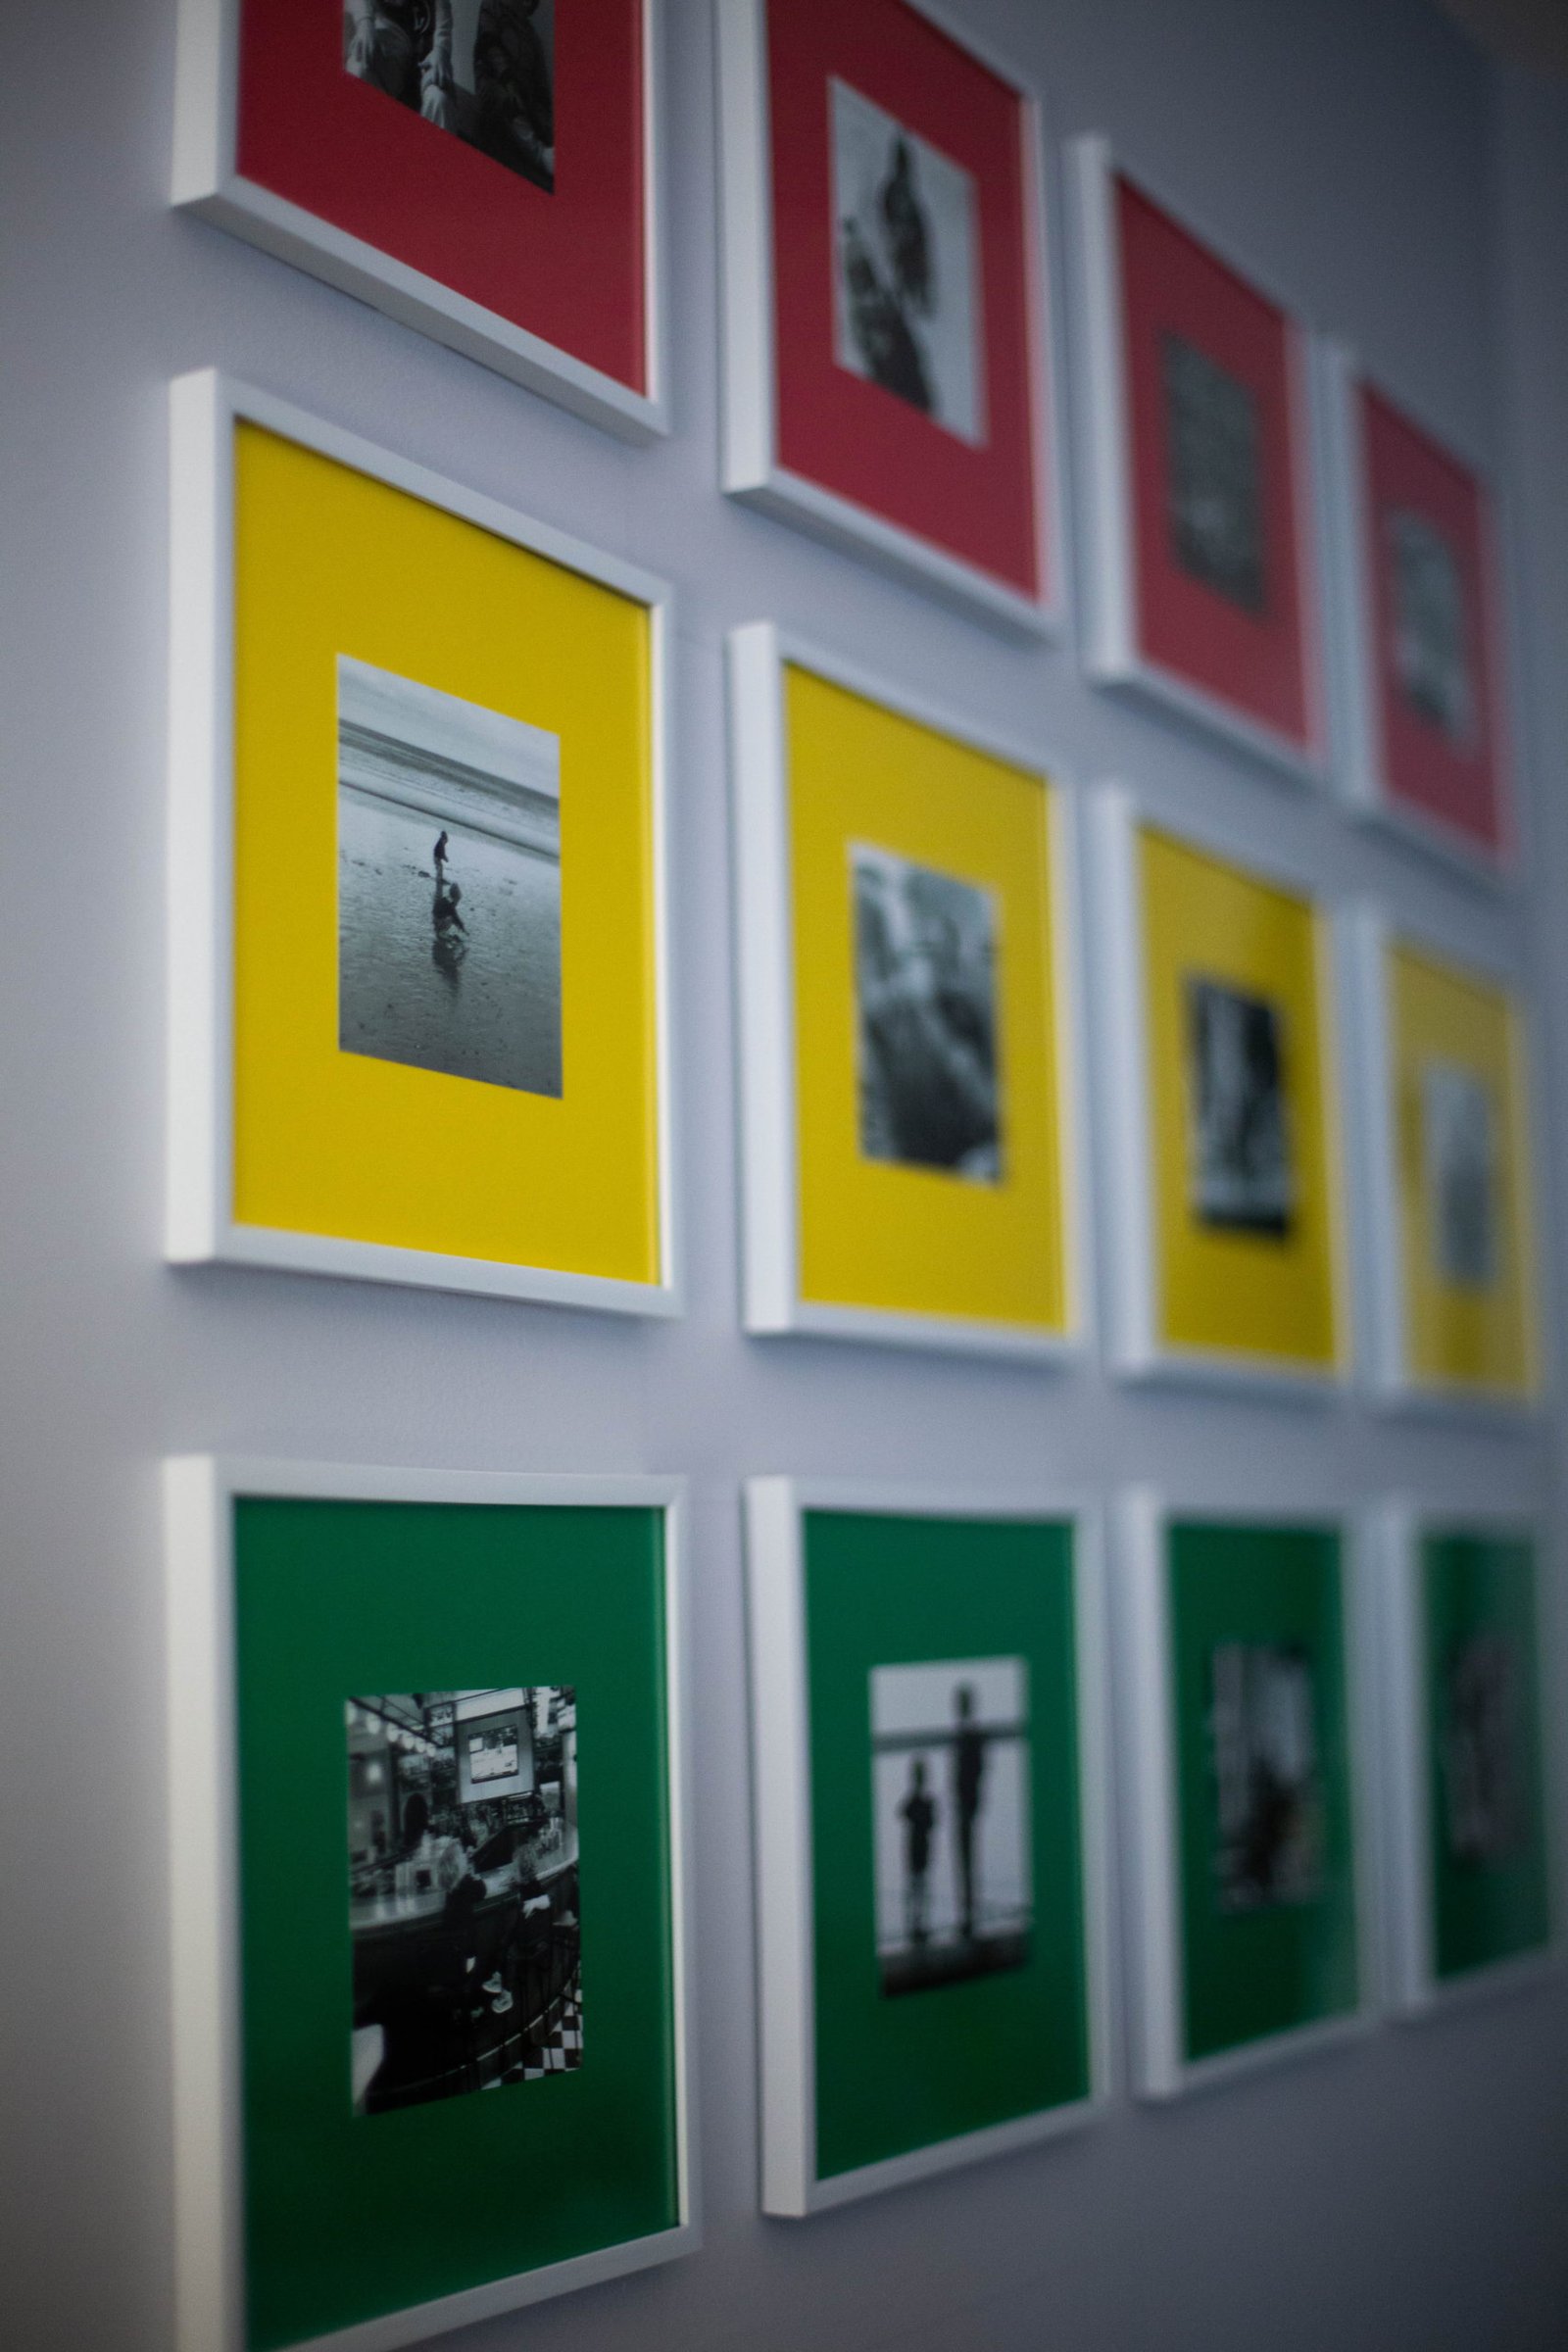
    Above the bookshelf we created a fun photo gallery using all pictures of our boys together. We included everyday pictures and special memories from trips we’ve done. I love watching the boys comment about each photo and what they were doing in the photo or where we were. We had them printed in square size and gave you full DIY post about the colorful wall here. On the bookshelf I styled it with this AMAZING lucite mid-century globe I picked up from 28 Furniture Co. and vintage Minnie and Mickey banks that my parents bought their very first trip to Disney World!


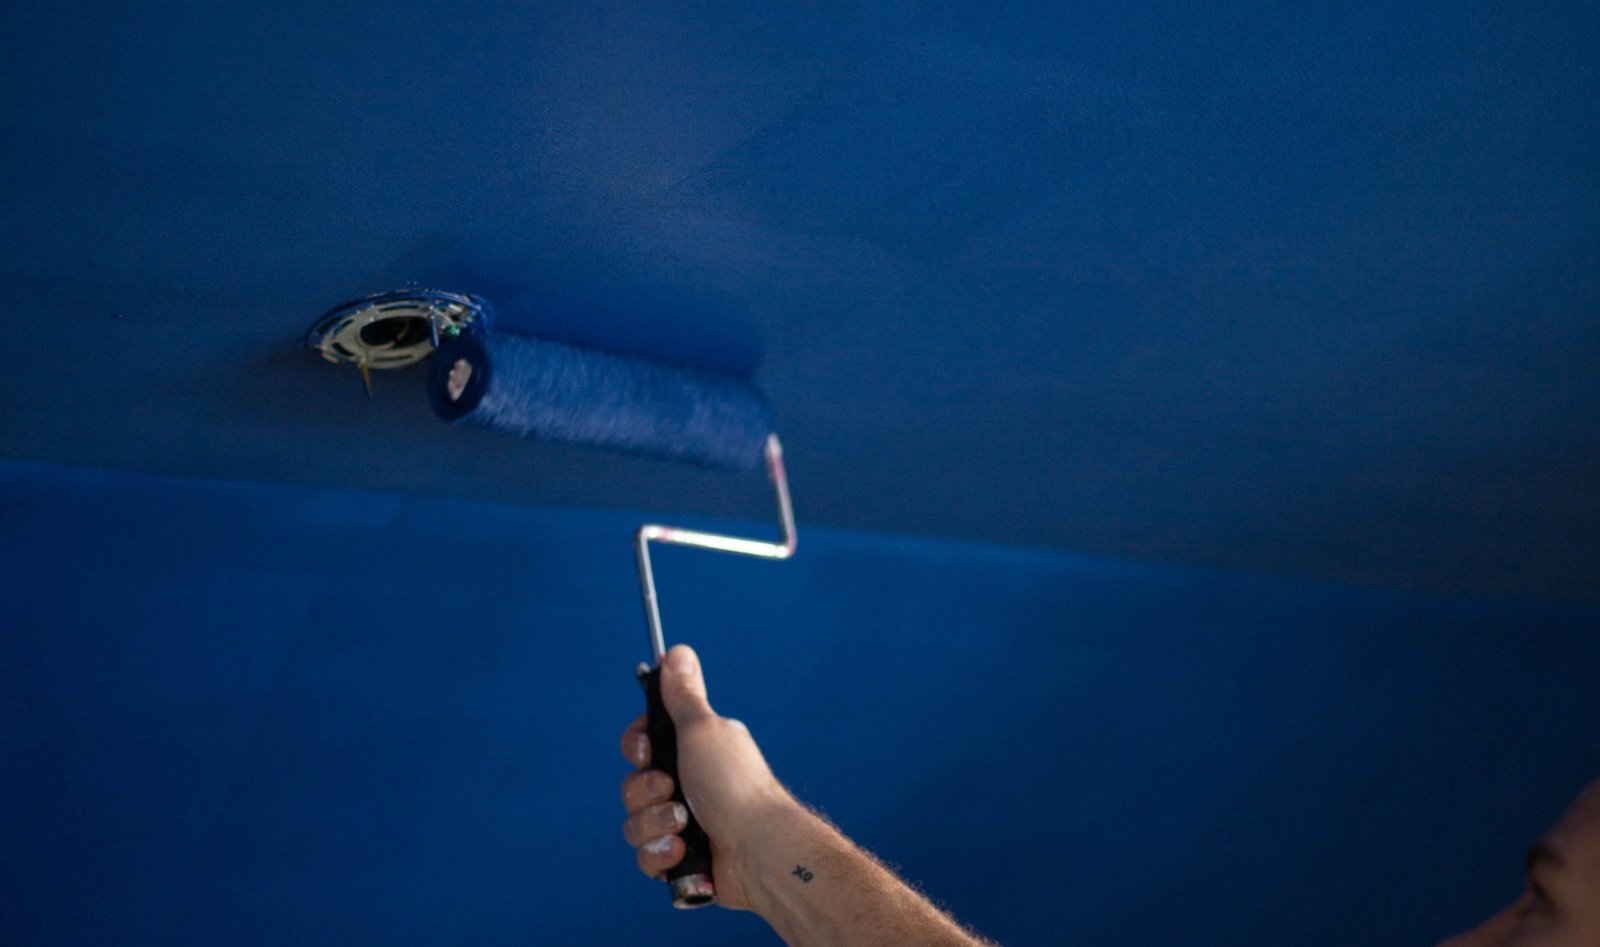
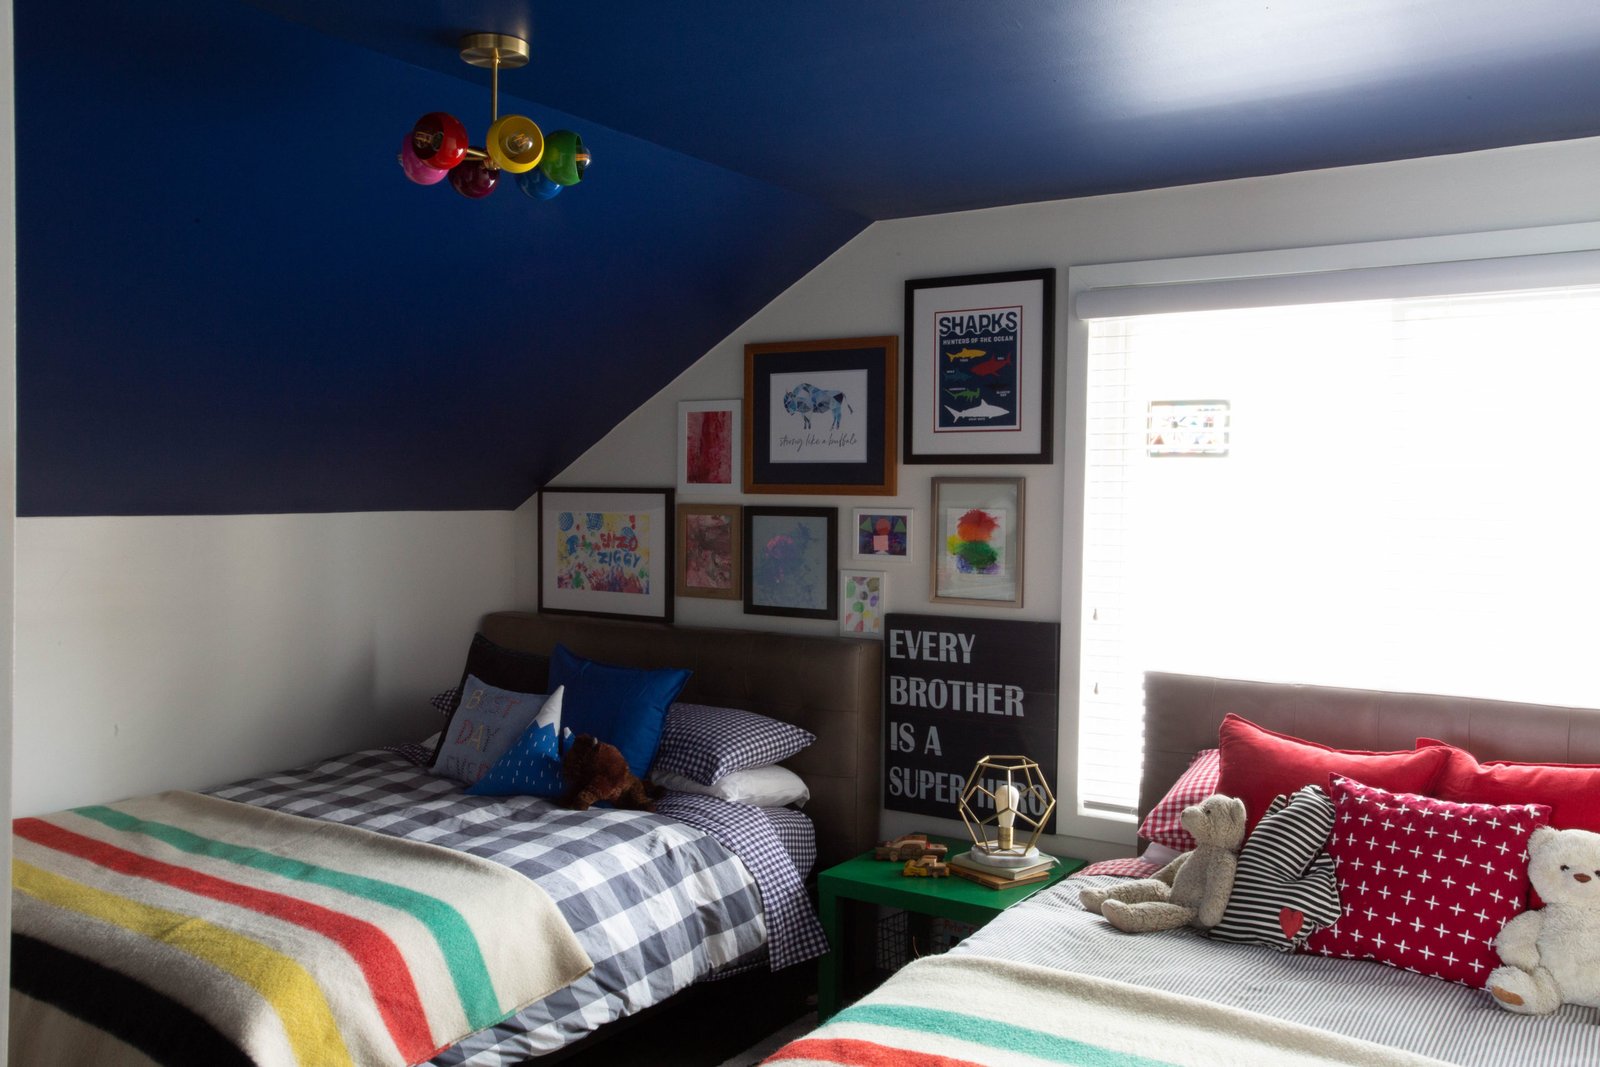
    The ceiling was a game changer. Having an angled ceiling really did effect the entire design on this room. No chance bunkbeds were coming into play. So I really wanted to provide a fun element drawing your eye up. With Ziggy’s love of blue, creating a dark ceiling seemed like an easy element to play off of. We went with Sherwin Williams Commodore. I actually had one reader tell me she thought it might help with sleep…and I’m totally loving that idea. We did a full post on how to paint your ceiling dark because there are a few simple tips we use to ensure it comes out just the way you planned.


    The next brilliant idea I got was to put stars on the ceiling. Because didn’t everyone grow up with glow in the dark stars at some point in their life on their ceiling…hello fun! Michael wasn’t so game for sticking them all over our freshly painted ceiling. Not a problem. I came up with another perfect solution…glow in the dark paint and stenciled stars. I mean it’s a win win, right!  But we just fell short on time for this project. We plan to use stencils from Royal Design Studio to create a fun layered look. We used both the starry night stencil and falling stars stencil together. So stay tuned for an update on that project in the next couple of weeks. We will use Martha Stewart Crafts Glow in the Dark Finish…so fingers crossed it turns out.


    With the boys beds I really wanted them to look just like them.


    The easiest way to do that was color. Enzo’s bed screams red and Ziggy’s bed is calling out blue. But I didn’t want the bedding to feel like it threw up red and blue, so I toned the bedding down with gray duvet covers. To help the space have a cohesive look I added these really rad vintage blankets! When I decided on pillows for the boys beds I wanted our kids to be able to make their own beds without too many pillows. Yet at the same time be aesthetically pleasing for me to love just as much. I went with four pillows per bed plus the two they sleep on in stacks. All each boy needs to do is add the decorative pillows in front of their already stacked sleeping pillows.


    The rug in between the boys beds is perfect for this space in so many ways. But my favorite part about this versatile rug is it is WASHABLE! Yes, you read that right it is 100% washable and I am so in love. We have the Bereber Beige Runner by Lorena Canal. It is seriously so soft. We continue to find our dudes sitting in-between the two beds! They are made with 100% cotton so you know that could explain it all. And they fit perfectly into our lifestyle. Style and function a perfect blend!


    Wall art is always important to me. I feel this is the perfect way to add more character into any space. Plus, I love how beautiful prints look when framed and matted. We love working with framed and matted for simple and easy online ordering with beautiful results. Kimberly from Small Moments designed some incredible prints for our dudes. What’s so fun is without telling the boys who the print was for they immediately knew…clearly we did something right with the design. We had the boys create their own art for this space, too, which has been added throughout their room.


    Lighting in a space really creates the right vibe. With angled ceilings we hunted for the perfect ceiling fixture. This one from Sazerac Stitches is exactly what I have been dreaming of. I love how the colors add to the overall vibe and the light that the small pendant puts off is perfect. On the boys night stand I really wanted a reading light. We found this simple one that works out perfectly for the space. But what I love most about this fixture is the light bulb inside it! I mean come on, how rad is the painted light bulb by Relamp. What I love about these bulbs is not only are they cool to look but they reduce energy use, supporting worthy causes and making my heart extra happy because how I love seeing creativity at work! We’ve got the light marble bulb in our space.


    This project has been fully rewarding every step of the way. Watching Enzo and Ziggy’s excitement for each new element added has such a joy. There is something so pure about childhood and we feel truly grateful to experience this stage of life with both our dudes. I hope this space brings you inspiration, passion and motivation to create a space you love.


    We want to give a HUGE thank you to all our sponsors that helped make this room come together. If you haven’t checked out these rad companies you need to now!


    Lorean Canal
    Sazerac Stitches
    Relamp
    Imagine That Children’s Art Studio
    28 Furniture Co
    Small Moments
    Framed and Matted
    Hickory Hardware
    Royal Design Stencils
    Sherwin Williams


    Looking for more design inspiration? Get over to the ORC page! They’ve got a running list of everyone who jumped into this challenge head first this year. So many beautiful and inspirational spaces for any project you’ve got on your list! We’ve linked the page in the picture below!


    I’ve linked all sources we used throughout the space for you! As always thank you for your continued support and we hope to see you back here soon.


    Much love,


    Danielle and Michael


    Ceiling Paint – Sherwin Williams Alabaster
    Grow in the Dark Paint – Amazon
    Starry Night Stencils – Royal Design Studio
    Falling Stars Stencil – Royal Design Studio
    Instagram Wall Frames – Wayfair
    Colorful Matte for Frames – Amazon
    Buffalo Print – Small Moments
    Shark Print – Small Moments
    Buffalo Check Duvet Cover – Ikea
    Striped Duvet Cover – Ikea
    Vintage Blanket – Ebay
    Buffalo Check Flannel Navy Blue Sheets – Pottery Barn Kids
    Buffalo Check Flannel Red Sheets – Pottery Barn Kids
    Red Decorative Pillows – Ikea
    Navy Blue Decorative Pillow – Ikea
    Blue Decorative Pillow – Ikea
    Blue Mountain Pillow- Target
    Red XX pillow – Pottery Barn Kids
    Blue Best Day Ever Pillow – Pottery Barn Kids
    Michigan Striped Pillow – Sew Nifty Thrifty
    Rug – Lorean Canal
    Ceiling Light Fixture – Sazerac Stitches
    Table Lamp – Target
    Printed Light Bulb – Relamp
    Dresser – Ikea
    Hardware – Hickory Hardware
    Bookshelf – Ikea


  • CREATE A ROOM FULL OF COLOR

    CREATE A ROOM FULL OF COLOR

    We’ve got one week to go until the final reveal and it is for sure crunch time for us. I’ve been busy working on all the final details for this space to make sure each element speaks to our dude’s personalities while being functional for a 5.5 and 3 year old. In week one I talked a lot about how I wanted to have the boys help us design their room. I actually did a list of five ways you can have your kids help create or design their own bedroom, so if you missed that go check it out here.


    And if you’ve missed any of the progress over the last 5 weeks, take a peek at the posts below!


    Week 1  |  Week 2  |  Week 3  |  Week 4


    Color has played a really important role in this room


    Enzo loves red and Ziggy is obsessed with blue. I knew that the room had to incorporate both colors without screaming patriotic or having red and blue walls! To make this happen I started with the boys beds. I layered in pillows to make sure the beds looked polished but not too much work to put together, so it allows for our kids to make their own beds in the morning.


    I found these vintage Hudson Bay wool blankets and quickly became obsessed with them. But they were just a little out of our budget for two queen size blankets, so thank you internet and eBay for helping me find very similar looking ones that are vintage Polar Star striped blankets from JcPennys! This totally helped keep the red and blue flowing while balancing with some yellow and green. Gotta love the primary colors. I also like how this helps give the room a more cohesive feel without feeling too matchy matchy.


    In between the boys beds I wanted to create a cozy feel and a rug was what was needed. But I really wanted a versatile rug that could last the play of two little dudes. Can we say hello to this washable rug by Lorena Canal?!? We went with the Berber Beige Runner and I couldn’t be happier with our choice. I’ve already found the boys playing between the two beds with the toys that magically make there way upstairs ? Enzo is loving reading on the rug with all the books we’ve got going on too.


    In our house reading is a BIG DEAL and I wanted to ensure the boys had enough storage for all the children’s books. Ok, maybe not all of my children books, you guys I’ve got an entire classroom library selection of books, but enough storage for lots of book choices! I decided to color code the books because it makes me happy and I know this is a system that is super easy for both our dudes to follow when putting the books away!


    Last week we chatted about our new dark blue ceiling. But what we didn’t get a chance to talk about was this rad lighting we’ve got going on in this space. Having the angled ceiling made picking the perfect light a difficult task. I desperately wanted a piece that added personality and color to the space and this one by Sazerac Stitches is just perfect. Kristen and Matt are a husband and wife team ? based out of New Orleans who love to make things. And you guys let me tell you the things they make will not disappoint. We have the Bright Acro wall sconce or ceiling fixture in 8 inch. The bright rainbow mini eyeball shade with a mid-century modern vibe just makes my heart so happy. If you haven’t checked out their lighting yet you need to!


    Having the boys create their own art for this space was important to us. We wanted them to feel proud of the art they made and found in their own space. We are fortunate enough to live in an area that has a rad art studio for kids. The boys visited Imagine That Children’s Art Studio and made some incredible art that I am working on framing to create a gallery space. For all local readers I am excited to share we’ve got a discount code for you to use for the studio. The code is “clarkandaldine” and it is for 20% off anything in studio from now until January 1, 2019!


    We also worked with another local artist who we both adore; Kimberly from Small Moments. You guys might remember her from the awesome prints she created for us inside our boys playroom! For this project we gave her a list of all the boys favorite things and she created the most perfect prints for both boys. I am seriously obsessed with them. They speak to both boys exactly the way we wanted. And watching the boys light up when they saw them was pretty amazing. These are going to make their way onto a gallery wall for next week’s final reveal. They are framed and matted from framed and matted…talk about the right name for your brand!


    I seriously cannot wait to show you guys more of this space next week. Now it’s crunch time to get all these last minute details put together. Including finding glow in the dark paint…not sure why I thought this was going to be a good idea. If you’ve got any good ideas on that one send them my way!


    Until next week…


    Much love-


    Danielle and Michael
  • HOW TO PAINT A DARK CEILING

    HOW TO PAINT A DARK CEILING

    I can’t even believe we are at week 4 of the One Room Challenge. It feels like this is the week on almost all our projects that I can really start to see the design come together. For us that had everything to do with the ceiling. Yes, you totally read that right. In this space the ceiling is doing all the talking. Its dark, it’s moody and it’s everything my heart wanted and more!


    But before we go any further, be sure to catch up on our boys room makeover by visiting week 1, week 2 and week 3.


    I honestly couldn’t be happier with how it has all come together. When Michael and I started chatting about how the dark ceiling would truly transform the space we realized that painting a ceiling dark does have an art to it. An experience we wanted to share just in case you’re dying to have a dark ceiling or even wall, you too can make your moody dark space come true.


    ESSENTIAL SUPPLIES TO PAINTING A CEILING

    • Paint (sheen is important when dealing with a ceiling)
    • Drop cloths
    • Roller
    • Roller Cover
    • Brush
    • Paint cup
    • Paint tray
    • Paint tray liner
    • Tape
    • Patience


    how to paint a dark ceiling


    HOW TO DIY A DARK CEILING

    1. Prep your space. We can not stress this enough. Proper prep will make or break your paint project. Start by laying drop cloths on your floor and over any windows (window treatments) and doors. For a ceiling, this is pretty much all that matters.
    2. Be sure to remove any lights or smoke/carbon monoxide detectors that are secured to your ceiling.
    3. Open your paint, stir in each direction, and pour a bit into a paint cup.
    4. Begin your first cut around all of the edges. It is a really fun process…(insert sarcasm emoji).
    5. Once you’ve cut the entire perimeter it is time to roll. So pour some paint into your paint tray, load your roller with some paint and begin to roll.
    6. Make your way across the entire perimeter and allow time to dry.
    7. Repeating steps for your 2nd coat of cutting and rolling.
    8. Allow time to dry…I like to give it a full 8 hours when dark.
    9. For dark and tricky colors (especially red) a third coat is an absolute must. I find that cutting a 3rd time is not always necessary. But you make the call.
    10. Allow the final coat to dry and inspect in all different times of the day and night to ensure you’ve covered well. If a 4th coat is needed, apply.


    We hope you enjoyed this tutorial! And in case you haven’t yet, head over to the one room challenge and check out all the other fun design projects happening there.


    Till next week!


    Much love-


    Danielle & Michael


  • OUR MAIN FLOOR BATHROOM DESIGN

    OUR MAIN FLOOR BATHROOM DESIGN

    Our main floor bathroom has been an eye sore from the day we moved in. We did a quick update on the space when we first moved in, which you can see here. We’ve been planning out this tiny space in our head for quite a while now and can’t wait to get to work. To give you an idea of what it looked like before we gutted it, here’s a few images!
    We’re excited to bring you on the ride with the hopes that we can inspire, motivate and encourage you to tackle your own bathroom project. In our space I started with design elements I absolutely knew I wanted and added in layers from there.

    Subway tile is the best tile!

    I knew that I wanted subway tile as this is truly a classic tile that continues to bring me joy every time I see it, which in my book means it’s worth using over and over again! After a ton of searching I landed on the longer beveled edge tile with a light gray grout for the shower and half way up the wall space. My next major design decision was between paint and tile. I wanted to make sure the undertones in both the tile and paint went well together. Seeing how all paint cost pretty much the same amount picking tile first is an easy next step. I like to have all tile samples in our house to pick out what I like best. And making sure everything goes together.
    Since our bathroom is extremely small we’ve decided to build our own vanity to really maximize the space of the room. The deepest we can go is 18 inches. I would like the vanity to be a little bigger than 24 inches wide and the only way to make that dream come true is to build it. We promise to give you a full tutorial on just how we plan to make that happen!
    For now I will leave you with all our design elements we’ve pulled together. I cannot wait to share every step of the way with you. In the next couple weeks we will be doing a full post on how to paint a small space and all the steps you need to make that happen! Make sure to check back in for this and the final reveal, right around the corner!
    Much Love-
    Danielle & Michael
  • OUR FALL HOME TOUR

    OUR FALL HOME TOUR

    I going to be honest…Halloween hasn’t always been a favorite time of year for me. But as our dudes fall more and more in love with this season I’m finding myself drawn in more, too. That and I absolutely love decorating our house…or basically any time I can create a fun environment. So here you have it, our house tour for Halloween. I love coming up with small little ways to make our home feel right for the season.


    Make your porch feel welcoming and festive for Fall!


    Let’s start with the front door because that’s the way into the house. Here I made our porch feel like fall, hence the all the leaves, lanterns and pumpkins! But I also wanted to have some Halloween to it. So clearly that’s why I added the black bats!


    This was ridiculously easy for me to do. I simply printed silhouette of a bat, cut it out and used it to trace more in 3 different sizes. Because the bats will be living the outside I covered them in contact paper on both sides to help make them last for the season! I’ve taped them up for everyone to see and enjoy.


    One of my absolute favorite places inside any home I decorate is a mantel. But you guys we don’t have a mantel!? So I’ve got to get creative around here. The places I pick to add holiday/seasonal decor to is shelves, windowsills and on top of any furniture that can house a few decorative items! I love giving each space it’s own unique feel for the season without feeling too forced!


    This year I tried something new and turned our books around on the bedroom shelves. Michael isn’t so sure how he feels about it. But I’m digging it. We both feel like they are calling to us to read them…maybe that’s a good thing! I also love how the decorations on the shelves stand out.


    Enjoy!


    Much Love


    – Danielle and Michael


  • DIY COLORFUL INSTAGRAM PHOTO WALL

    DIY COLORFUL INSTAGRAM PHOTO WALL

    Wow! This past week has been insane. As life goes we’ve had some wild ups and downs. Which leads us to where we currently are at…BEHIND!  This week we had planned to showcase the rad transformation of one of the walls in the boys room and that you guys just didn’t happen. But have no fear we’ve got another fun wall transformation to showcase for you. This week we took a bland looking wall and added some life though color and photos of our dudes. It was a simple and easy project that just about anyone could do. You just need a few simple tools and these easy steps and you will be good to go!

    ESSENTIAL SUPPLIES TO MAKE A COLORFUL WALL


    HOW TO MAKE A COLORFUL INSTAGRAM WALL

     
    1. Cut matte down to 8×8 using a straight edge razor and ruler.
    2. Pre-plan where you want all the images to go before taping them down on the matte.
    3. Using the double sided tape, tape on 2 or 4 corners to secure the image.
    4. Clean both sides of the glass prior to putting the image and matte in.
    5. Measure the space where you plan to hang the images. Be sure to calculate vertical and horizontal some space between each frame, assuming you’re doing rows like we did. Once you’ve found your top line, place a level on the wall and draw a line. This is where you’ll place your nails for the first row.
    6. Hang your frames 1 by 1. We like to use a small piece of 3M Double Sided Tape to secure the leveled frame to the wall.
    7. Repeat steps for each frame and row.
    Next week we plan to showcase our how we are tranforming another space in this room and the process we did to get it just right. If you’re still itching for more make sure to check out week one where you’ll find our design inspiration for this space. And don’t forget to click the image below to see all the awesome rooms happening for the One Room Challenge right now!

    Much love-

    Danielle & Michael

  • HOW TO CREATE A 3D WALL TREATMENT

    I think it’s safe to say we’ve officially learned that trying to blog in real time about two projects happening simultaneously is a bit overwhelming. Plus you know, sick kids or just kids in general make life one wild ride. We started off on a great note with week one, but needless to say we didn’t get week two posted like we wanted as part of the one room challenge. But we just roll with it. So here you have it. How we took the jungle looking wall that we have grown to love into a 3-D space that has just added a whole new layer and depth and fun in the boys space! And as promised we’ve got a full break down just how we did it.

    WHAT SUPPLIES TO MAKE A 3-D WALL TREATMENT

    • Table saw
    • Nail gun
    • MDF board
    • Nails
    • Tape measure
    • Chalk box
    • Paint
    • Paint sprayer
    • Tape

    HOW TO MAKE A DIAMOND WALL

    1. Take your tape measure and stretch it vertically, beginning at the ceiling and making a mark at every foot. Repeat steps for the remaining 3 sides of your wall and make sure to measure top to bottom, and left to right (or right to left) – just make sure to be consistent.
    2. Take a chalk box and snap a 90 degree line from your first vertical mark to your first horizontal mark from the bottom. Work your way up the side of the wall, and once you reach the ceiling you’ll be snapping a few lines to coinciding marks on the base. This is a 2 person job – do you will need some help. Repeat steps beginning at the bottom of the other side of your wall to ensure you complete an argyle pattern on your wall.
    3. I like to create a template on paper, make copies, and play around with the design of the wall before I cut any wood. For us this process was easy – our wall was 11 x 7, so an 8.5 x 11 sheet of paper worked for us. I just marked all sides every inch and drew the 90 degree lines. Then we made 5 copies and filled in the boxes with pencil until we found the perfect pattern.
    4. Once you have your pattern it is time to go back to the wall and begin measuring your cuts. DO NOT MEASURE THEM ALL AT ONCE! Pick a spot and start from there, making your way across the wall. And feel free to bounce around – do what feels best.
    5. Begin measuring your cuts with wood of choice. We used MDF board, which is light weight and soft. For a kids room we recommend this type of wood.
    6. Once you have your lines, align your table saw for a proper cut and begin ripping down your wood.
    7. Bring your cut piece(s) back to the room, place on the wall and attach with a nail gun. We used an 18 gauge brad nailer to attach our MDF with nails in each corner, the center of each side and a couple in the center of the larger boards. You can pretty much decipher what feels right piece by piece.
    8. Repeat steps for each piece of wood until wall is complete.
    9. Once all pieces are installed, take some wood putty or spackling.
    10. Allow to dry and sand for a smooth finish.
    11. Once smooth, apply 2+ coats of paint.
    12. Enjoy!

    how to create a 3D wall treatment

    We are all healthy and happy over here now so here’s to getting back on schedule and showcasing some rad things we’ve got going on in our dudes room!

    In case you haven’t yet, head over to the one room challenge and check out all the other fun design projects happening there.

    Till next week!

    Much love-

    Danielle & Michael

  • A SHARED BOYS BEDROOM DESIGN

    Alight, here we are in our third One Room Challenge project! For those of you new to us, Welcome! We are Danielle & Michael, the faces and creators behind Clark + Aldine. We are based in Michigan in what I like to say is an adorable little town between Detroit and Ann Arbor. Michael does all of our labor and carpentry and I do the design and style! Together we manage to pull off some pretty rad spaces and this one really hits home to us.
    This year we are tackling our boys bedroom. Our dudes are almost 3 and 5.5 and share a space together. This room of theirs has already seen many changes since we’ve lived in our house over the past 3 years. I will take you on a walk down memory lane.
    For our first One Room Challenge we added wood flooring to this space. Shortly after that we added the wall covering to give some dimension. While I do still love the wall covering and I am sad to see it go I am feeling like this space lacks our kids personalities and style. We want to create a space that when you walk into it, it just feels like them. And for us that doesn’t mean a themed room. It means a space with all things they love and want to be around.

    But let me say this – we aren’t creating another toy room. We want their bedroom to be a space they can go to relax, read, have down time and sleep. So you won’t see many toys in this space but you will find things that make them both happy. Since we are creating a space for our boys we wanted them to be involved in the design process. We’ve asked the boys to help with the planning phase which has been a lot of fun. Color was the easiest place to start. Enzo wants red and Ziggy wants blue. From there we’ve created list of all things the boys love. This made the first step of design easier to navigate through.
    A Shared Boys Bedroom Design
    In our plans we will be creating a 3-dimentional wall to replace the wall covering we currently have. We are going to enhance the angled ceiling by painting it navy, you’re very welcome Ziggy., and will add glow in the dark stars with two moons…less fights on whose side gets the moon. Red and Blue will help create the vibe for both boys but we will have pops of green and yellow to play off the primary colors. We are adding a bookshelf, art based around the boys interests and homemade art they are creating for their space.

    If you’re looking for ways to get your kids involved with design here a quick list, since you all know how much I love lists!

    HOW TO DESIGN A ROOM WITH HELP FROM KIDS

    1. Get their input on color – This is the easiest way to start. You don’t have to paint the whole room the color they choose, simply incorporate it throughout the room.
    2. Create a list of all their favorite things
    3. Have them create art for their space
    4. Take and place pictures of family, places or things they love and use it in their space.
    5. Encourage them to be involved in as much of the process as they can.
    I am most excited about creating a space that our boys feel like is made for them. Next week we are going to show you how we are planning the 3 dimensional wall to create a new fun element in this space. As part of this journey with the ORC you can check out what all the other participants are doing by simply clicking the logo below! Until next week!
    Much love-
    Danielle & Michael
    Inspirational images
    1/// 2 // 3
  • WE’RE HANGING ON TO SUMMER

    Thank you JaM Cellars for sponsoring this post. Looking for JaM Cabernet and Butter Chardonnay near you? Check out their easy-to-use Store Locator! Just pop in your zip code and the wines will be waiting!

    I can’t even believe that it’s here! We are celebrating the (almost) end of outdoor projects this summer! With Fall literally sneaking its way into our lives we’ve got wine from JaM Cellars to celebrate our success with this huge outdoor transformation! The cool nights that transfer us into the next season just make us so happy and offers the comfort to sit outside and enjoy the new look and feel.
    Let’s talk a minute about JaM! We’re a family that knows “Everything’s Better with Butter!”, and nothing says that quite like JaM Butter Chardonnay with its rich, bold, luscious, basically melt in your mouth with creamy-liciousness taste! You can go ahead and thank us later if you haven’t tried this wine yet. As summer continues to hang out here and Fall is a stone’s throw away we find ourselves continuously drawn to Butter after a long day of work.

    With everything we do, family always comes first.

    The celebration feels so different this time around. We’ve had a lot of change in our lives over that last several months with friends, family and our overall lifestyle. One that has given us lots of time to reflect and look at what is truly important to us. With everything we do, family always comes first. The belief is at our core. And we’ve found ways we can continue to grow, learn and celebrate life together.
    For this year’s “Let’s hang onto summer celebration” we’ve decided to throw a “let’s not get rid of summer to soon” with our dudes! We picked up a new addition to our patio, hello outdoor fireplace! Fall, we’re ready for you! Next up is a s’mores platter, because you know we’re winning at parenting when chocolate and marshmallows are involved! And while we love s’mores too, outdoor summer nights with a fire pair perfectly with JaM too! One of our go to favorites is JaM Cabernet. Uummm …blackberries, black plums, black currant, cassis and more—this easy-to-love wine is all about the fruit, and clearly why we love it so much! We love JaM Cab as the nights cool into the crisp Fall air! If you’re looking for some more ways to be inspired too, go ahead and check out JaM Cabernet on JamCellars.com.

    It wouldn’t feel right if we didn’t leave you with a few update pictures of all our hard work with this outdoor curb appeal! Oh, and one more thing, if you are looking to re-create any of these out door styles we’ve got you covered from paint to cedar planter boxes to exterior lighting.  Enjoy and go get yourself some JaM?

    I was selected for this opportunity as a member of CLEVER and the content and opinions expressed here are all my own.

  • HOW TO PAINT A GARAGE DOOR

    As with any project surprises seem to appear! And this year’s outdoor project has been no different. The big one by far was our garage door. It just completely stopped working! This was not part of our plan, budget or schedule for the year but one we absolutely had to address. We of course started with trying to fix the garage door through a professional service company. We came to find out we had a ridiculously old door with a side spring setup, which made the door extremely dangerous. Because this problem wasn’t part of our project, plan or budget we needed to think quickly on how we were going to solve the problem.

    So for us the most budget friendly solution was to buy our own door, paint it the color we wanted and install the door ourselves. Of these 3 things we’ve done one before this project. My guess is if you’re still reading you’ve already figured it out. The one project we’ve done now 3 times is paint our garage door. So naturally we want to share with all of you just how we did it!
    We’ve actually done with two different ways. The first two times we painted the door when it was already standing and this last time we painted prior to install. Let’s break it down with what you need to paint your own garage door and steps you need to take to paint the garage door.
    But first, let’s talk about paint. Due to material type and climate it is essential that the proper paint is used on this type of project. For us, that meant a paint type that was good for all climates. We chose Sherwin Williams Duration Exterior paint to allow buckling and warping of the metal garage door. When you choose a dark color, such as black, with a non-insulated door you risk having a garage that gets REALLY hot when it is warm outside. Given that our garage is detached and serves as half workshop, half storage for outdoor toys, we were comfortable with that color choice. We recommend you visit your local Sherwin Williams and speak with a specialist to help make the right choice for your home.

    Supplies you will need:

    • Garage door panels
    • Saw horses
    • Paint Sprayer
    • Long Sprayer Hose
    • Blue Painter’s Tape
    • Drop Cloths
    • Paint Gloves
    • Paint

    Step by step guide to paint your garage door:

    1. First, decide where you’re going to paint and prepare your area. Being OCD, I like to clean the area well and lay drop cloths. For this particular project, and due to the length of the doors, I had to paint them in our yard (so no cloths needed).
    2. Setup your saw horses and place single door panels on top allowing a solid 2ft for the panels to extend off at each end. This spacing will avoid bends in the door while giving you ample space to move and work around the panels.
    3. Open and stir your paint. I like to do 50 stirs clockwise and another 50 stirs counter clockwise.
    4. Time to setup that paint sprayer. Be sure to follow the directions on your specific sprayer – they’re all different. With our airless, we plug in, place the internal hose into the paint bucket and turn on to spray. For the first minute or so I’m spraying out water that is stored in the gun and hose from the prior cleaning – I typically spray in a cardboard box that can be recycled later. Once solid color paint comes out you’re ready to go to work!
    5. From one side to the next, pull the paint gun trigger and make even passes from side to side, finishing one section at a time. I try to keep the gun 6 – 12 inches away from the surface to ensure an even surface.
    6. Once the face of the panel is painted, go low and get the top and bottom of the door. You wont see these while the door is closed but when it is opening you will – be sure to pay attention in these spaces.
    7. Allow 2 hours to dry before moving and starting with the next panel. I suggest allowing at least 24 – 48 hours to fully dry and cure prior to install…weather permitting, of course!

    Additionally, we felt it was important to share the steps on how to paint an existing (installed) garage door, because we’ve done that too. So here it goes:

    1. Prepare your surroundings. Whether you choose to brush and roll, use a paint sprayer, or a combination of all it is essential that you lay drop cloths and tape areas susceptible to overspray or smears.
    2. If brushing, we recommend that you begin brushing the first coat on any areas that are below surface (the cubes, so to speak). If spraying, skip this step.
    3. Next, raise the garage door up leaving only the bottom panel and bottom of the second panel exposed. If brushing and rolling, brush the inner parts of the panels (the sections that show only when door is open/opening) and begin rolling the outside of the bottom panel. If spraying, just spray in lieu of brushing or rolling.
    4. Allow a solid hour or two before moving on to the next panel. Repeat for the remaining panels until the entire door has been painted.
    5. If a second coat needs to be applied, simply repeat steps.
    We hope you found this how-to useful! Please leave us comments to let us know!
    Enjoy –
    Danielle and Michael

    Thank you Sherwin Williams for sponsoring this post.

    how to paint a garage door yourself